Guide
DRIVE/ROUTE A: From Ubehebe Crater near the N end of Death Valley National Park, take the Racetrack Road (high clearance 2WD vehicles may be needed) S about 9.5 miles to the 4500 foot elevation level. Park here, making sure to keep all tires on the graded portion of the road. According to the Backcountry Regulations of DVNP, you're subject to a fine if your tires are off the road.
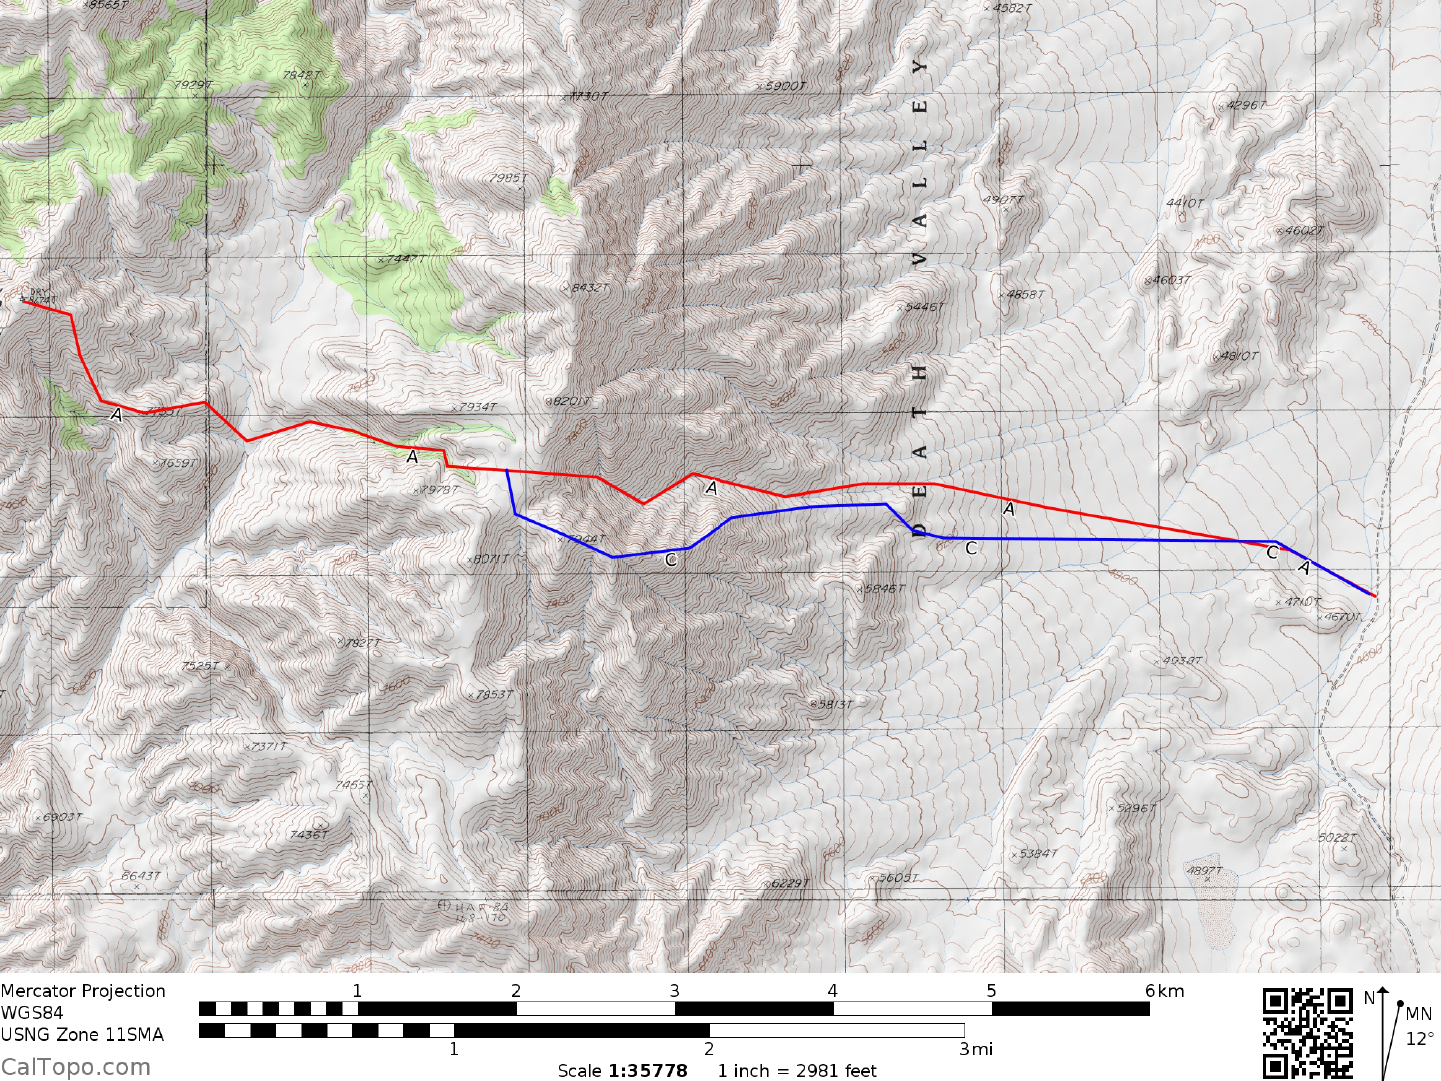
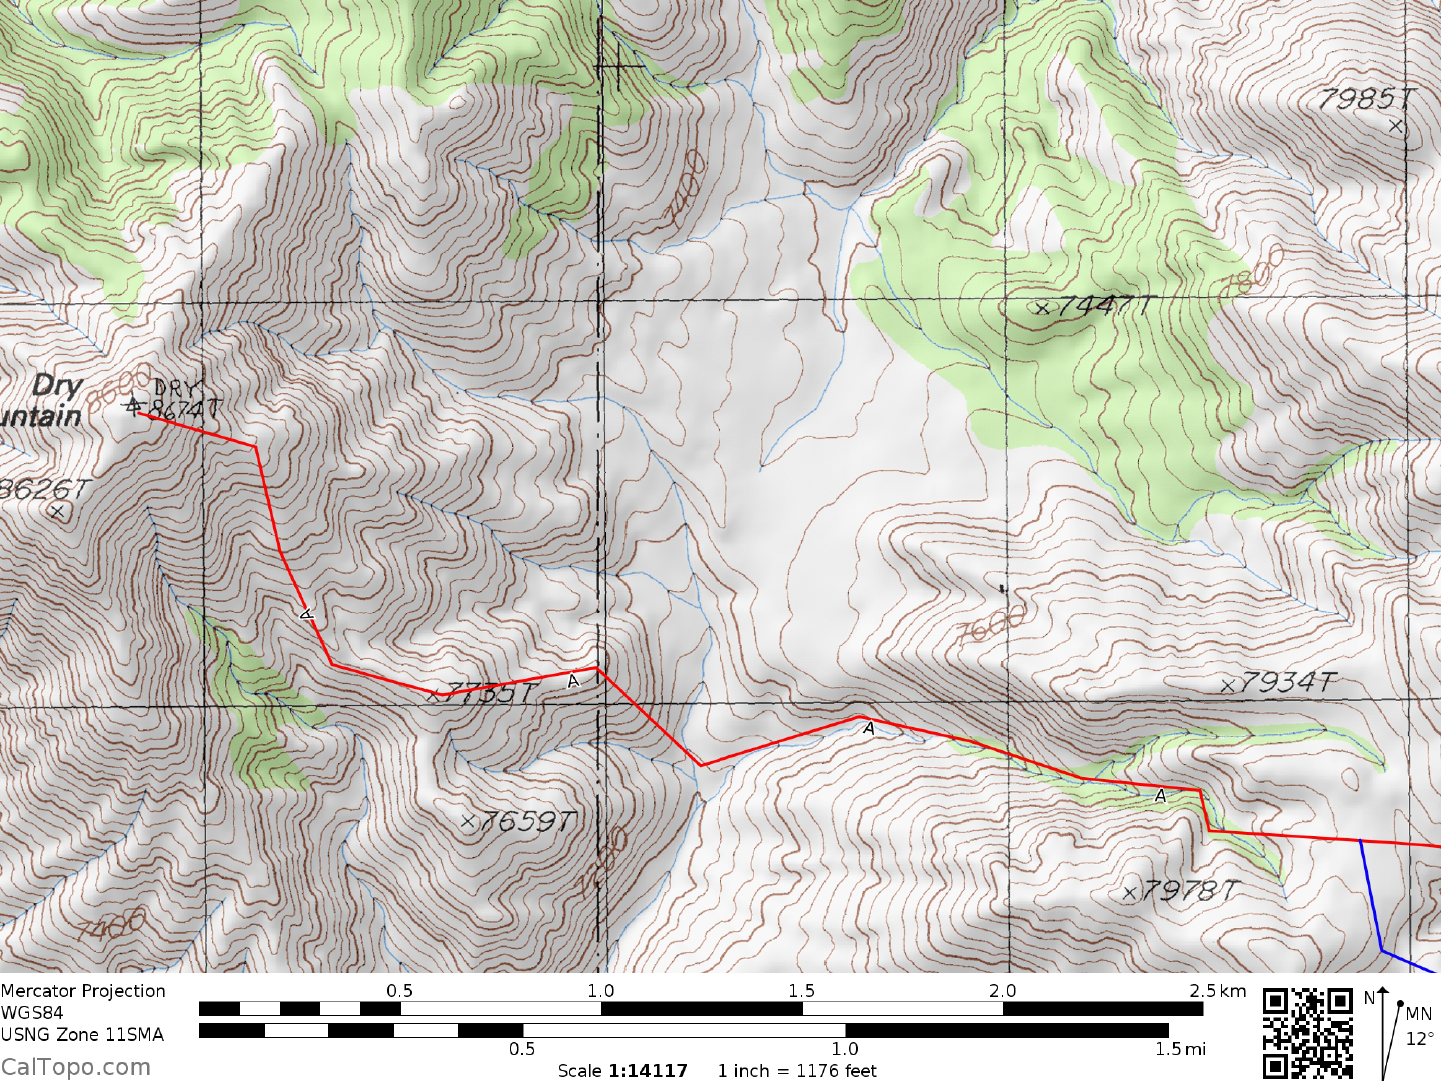
CLIMB/ROUTE A: See Map 1. Hike across the desert flats at a 280 degree bearing toward the mountain and an obvious saddle at 7900 feet elevation on the sky line ridge. Approaching the base of the mountain, you'll hike up a large wash which continually steepens as it appro aches the abovementioned saddle. From this saddle, which is located about 0.8 miles S of point 8432, the summ it of Dry Mountain can finally be seen at a bearing of 290°. Continuing W down the canyon or taking the ridge located just N of the canyon, descend to a large N-S wash near the 7100 foot level. From here proceed W up a ridge which is followed to the top.
ROUND TRIP STATS/ROUTE A: 5900 feet elevation gain, 12 miles, 10-12 hours
DRIVE/ROUTE B: From Olancha, CA drive 14.7 miles E on State Highway 190 to its junction with State Highway 136. Turn right on State Highway 190 and go 17 miles to the signed Saline Valley Road (If you're driving W on State Highway 190 from Panamint Valley, this turnoff is about 14 miles beyond Panamint Springs). Turn left (N) and drive 8.2 miles on this very good dirt road to pavement end at a fork. Bear right here on the signed, very good dirt Salin e Valley Road and drive 7.4 miles to its junction with the excellent dirt road heading NW down Grapevine Canyon and into Saline Valley. Turn left here and drive 25 miles to the bottom of Saline Valley and a road fork. Although the road to this point has been described as excellent dirt, it had been reported as having an extremely washboarded surface at times that can rattle the fillings right out of your teeth. Continue another 5.8 miles N on the Saline Valley Road to a junction marked by a large boulder. Turning right, drive 7.1 miles to Lower Warm Springs. Continue NE beyond Lower Warm Springs for 10.8 miles on a progressively deteriorating road and park at about 3240 feet elevation. This last 10+ miles is rocky and high clearance is needed, possibly requiring a 4WD vehicle.
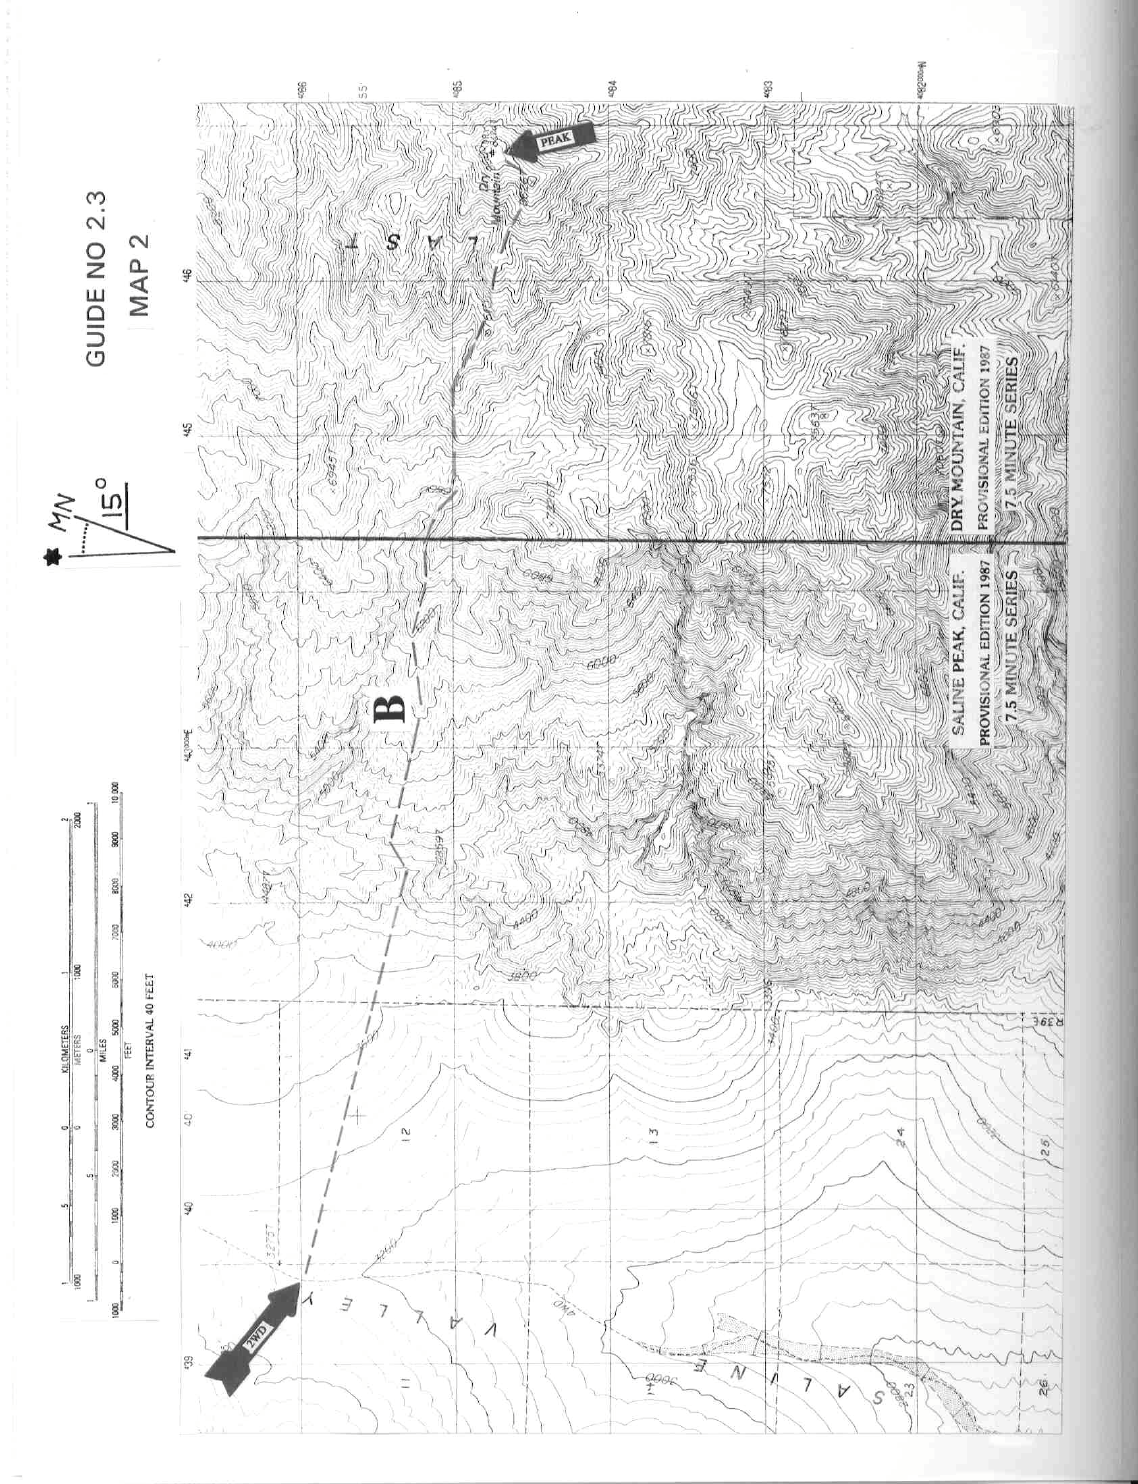
CLIMB/ROUTE B: See Map 2. Hike a 115 degree bearing toward a large alluvial fan leading to a narrow gap in the foothills. Almost immediately after passing through the gap the canyon forks sharply and the route proceeds up the left fork between a steep wall on the W and sloping slabs cut by numerous shallow troughs on the E toward an area of strikingly red rock. Proceed up to the top of the slabs, taking care to avoid causing a rockfall on the extremely loose terrain. Above the slabs the slope eases as a prominent ridge is gained. Follow the ridge E to a small saddle at 6400 feet elevation. Traverse around the N side of Point 7326 on a tedious scree slope, staying below the rocks of Point 7326 until it is possible to descend into the deep wash to the NE, just below the point where th e wash makes a sharp turn to the E. About 200 yards upstream from this sharp turn, ascend a slope on the N side of the prominent ridge descending from Point 7610. Climb this slope on the N side of the ridge until it is possible to gain the crest of the ridge to the NW of Point 7610. From here a distinct ridge can be followed E toward Point 8626 until it ispossible to traverse to the summit. NOTE: Descending from the mountain requires careful route finding, particularly below the 6400 foot elevation saddle. When descending the ridge below this point, numerous routes are possible due to forks on the ridge. These subsidiary ridges are separated at the base by deep gullies which are difficult and dangerous to cross. Unfortunately, the landmark red rocks in the initial gully are not visible from above until after a commitment to one of these ridges has been made. The bottom line is to be very sure of your descent route by turning around often during the ascent and memorizing the route.
ROUND TRIP STATS/ROUTE B: 5200 feet elevation gain, 10 miles, 10-12 hours
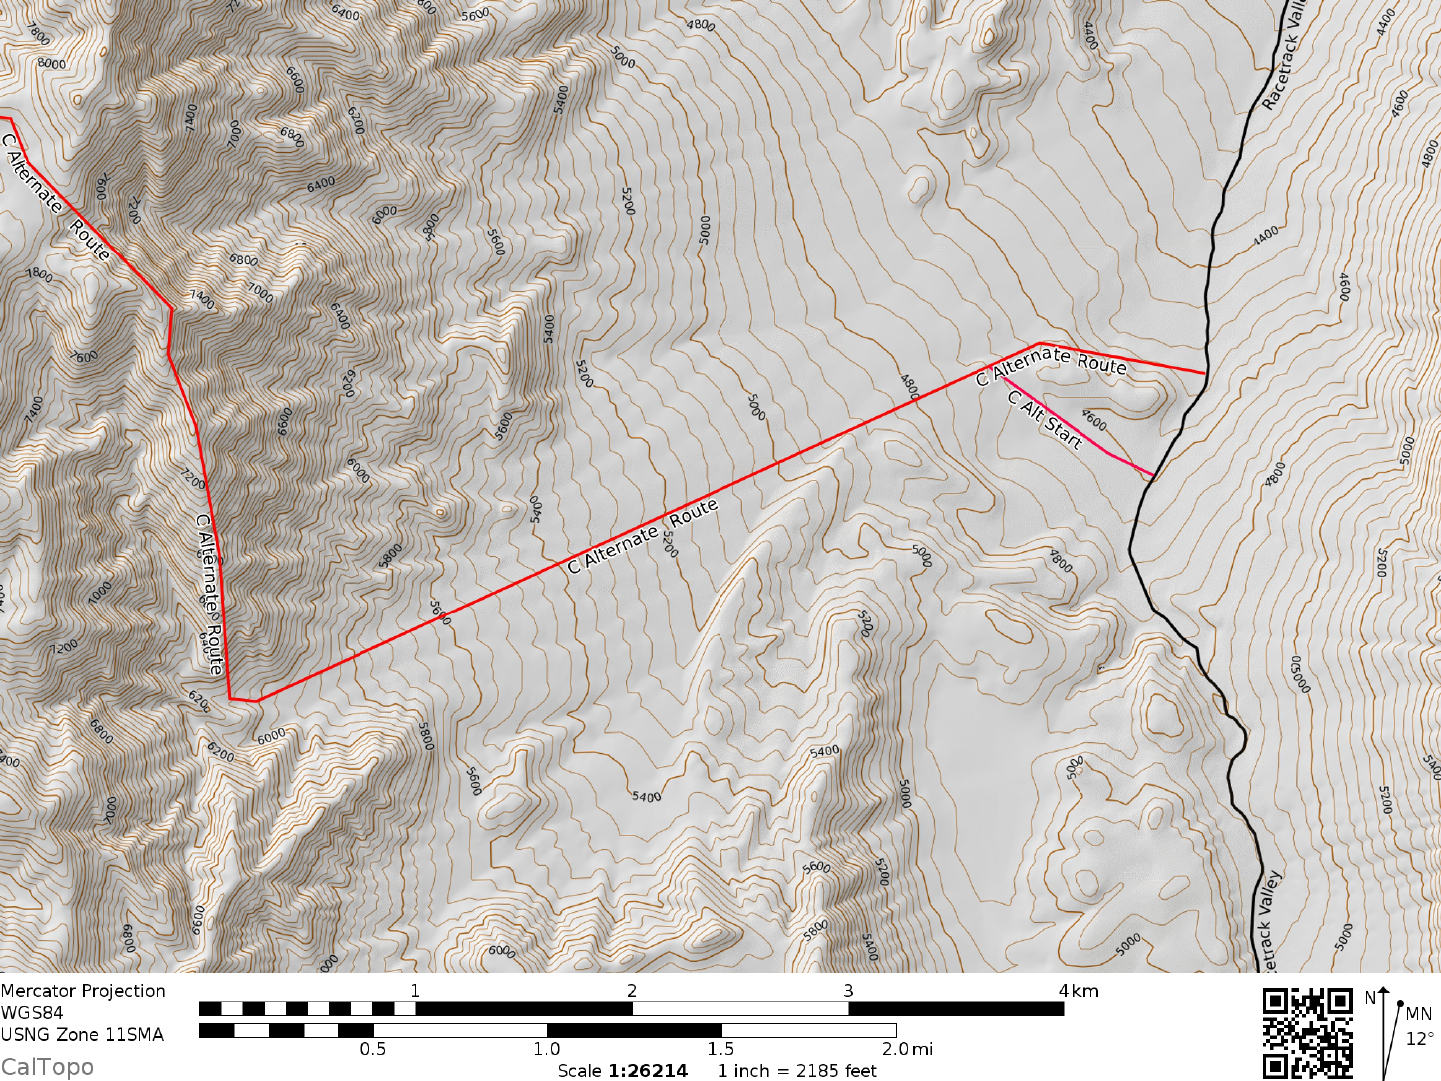
DRIVING DIRECTIONS FOR ROUTE C: See directions for Route A.
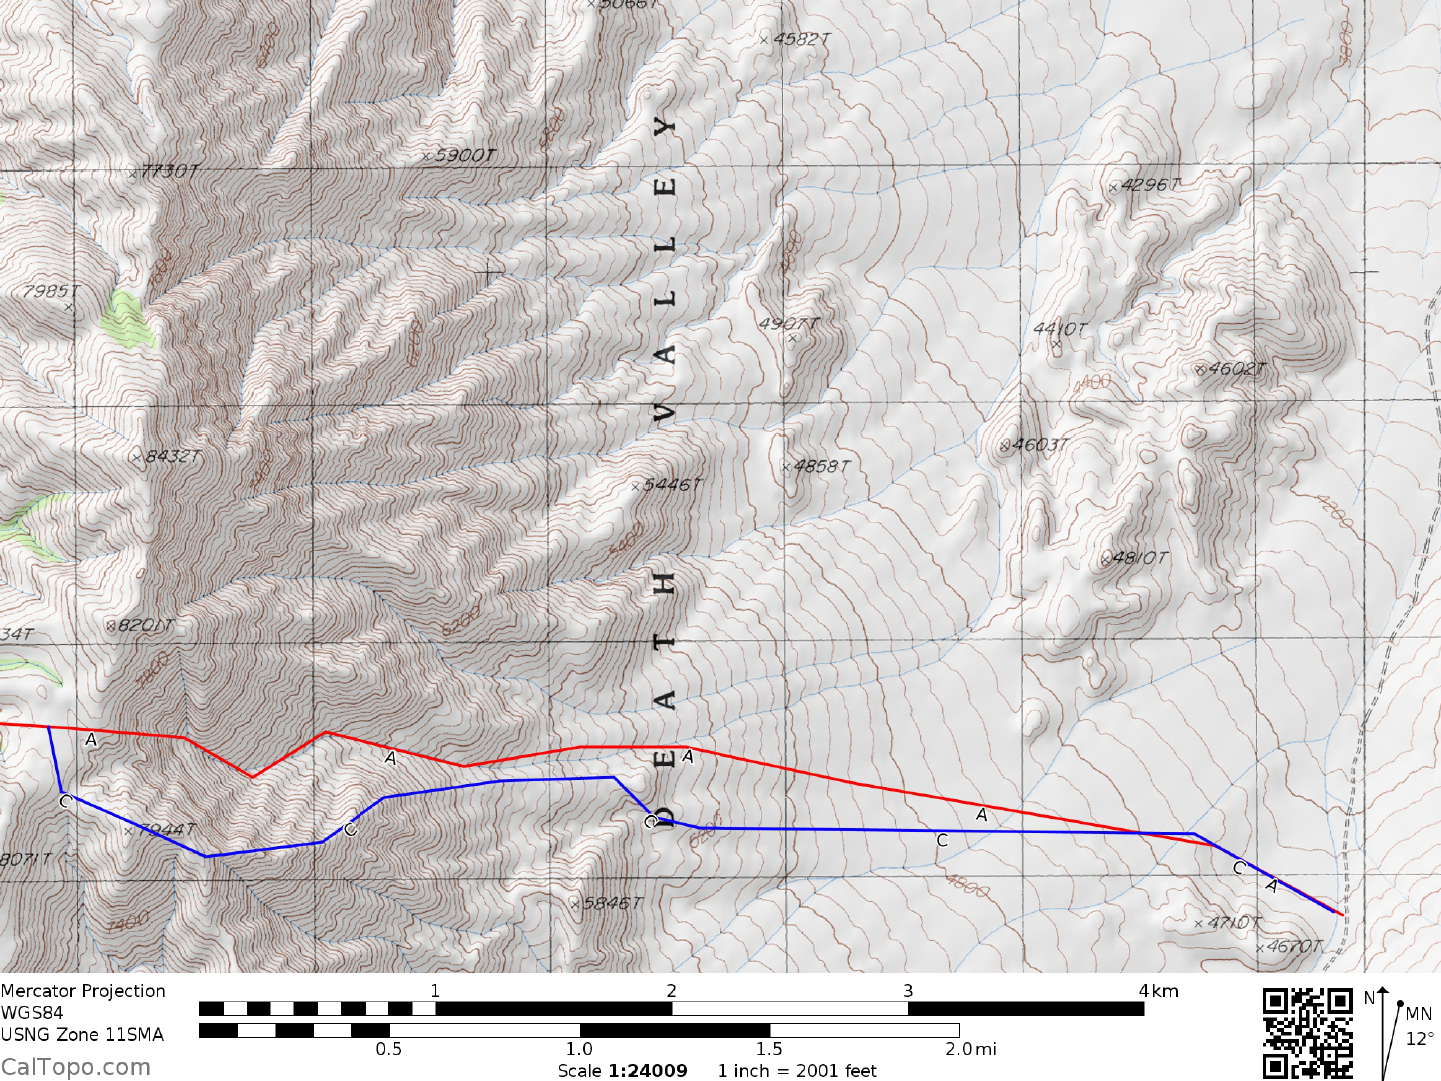
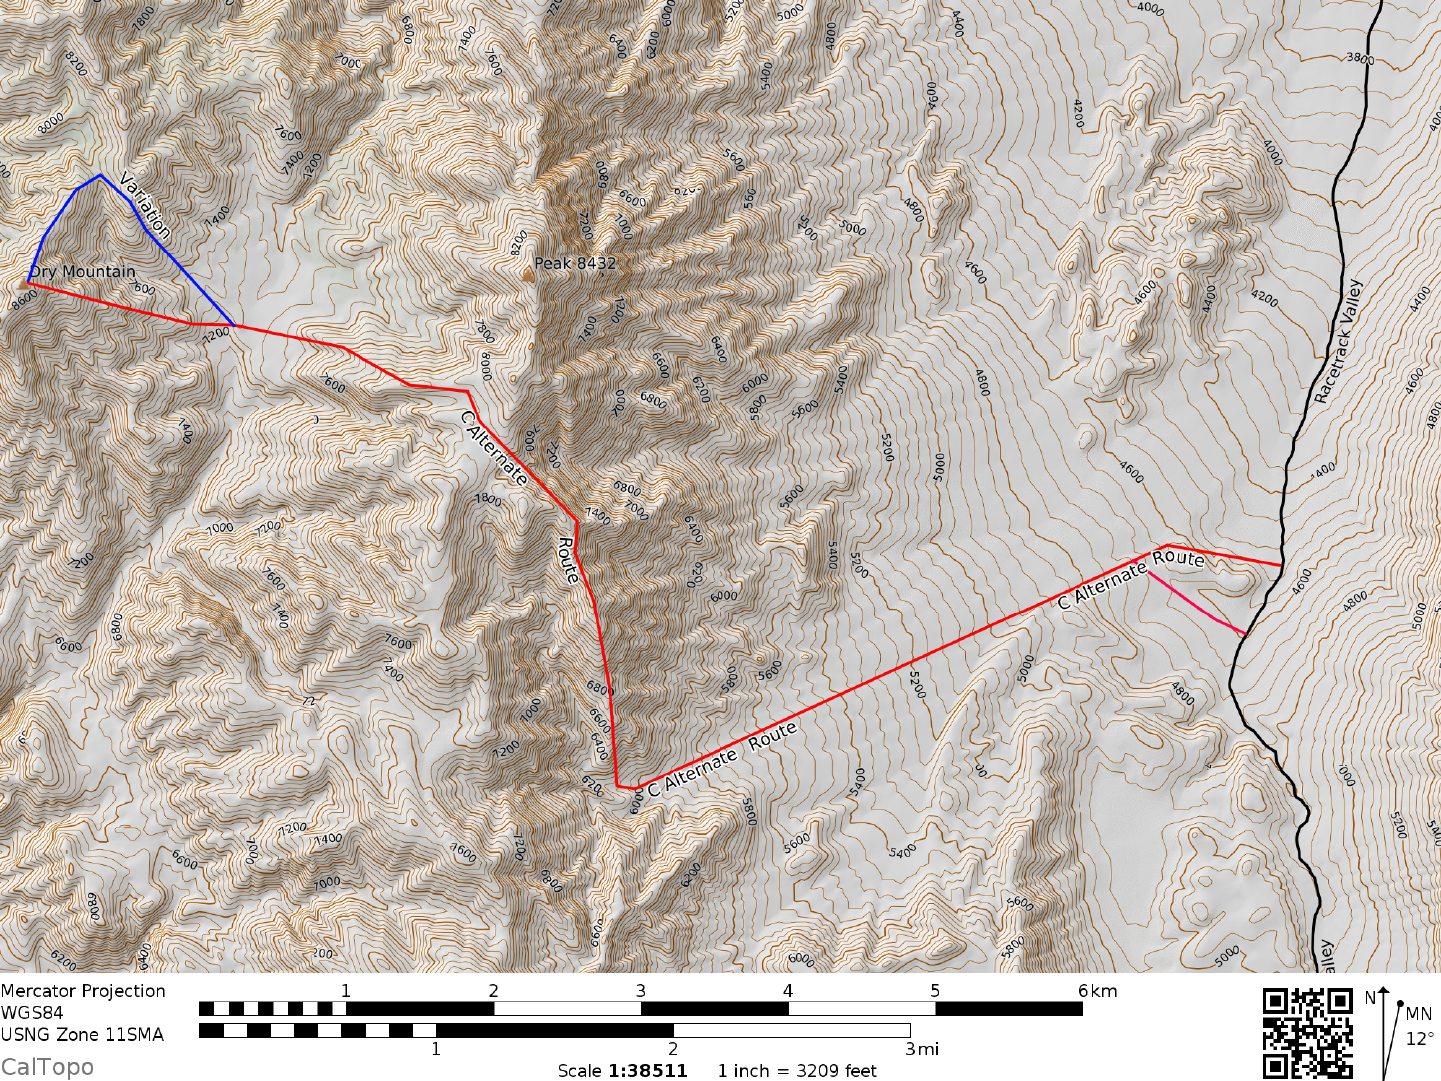
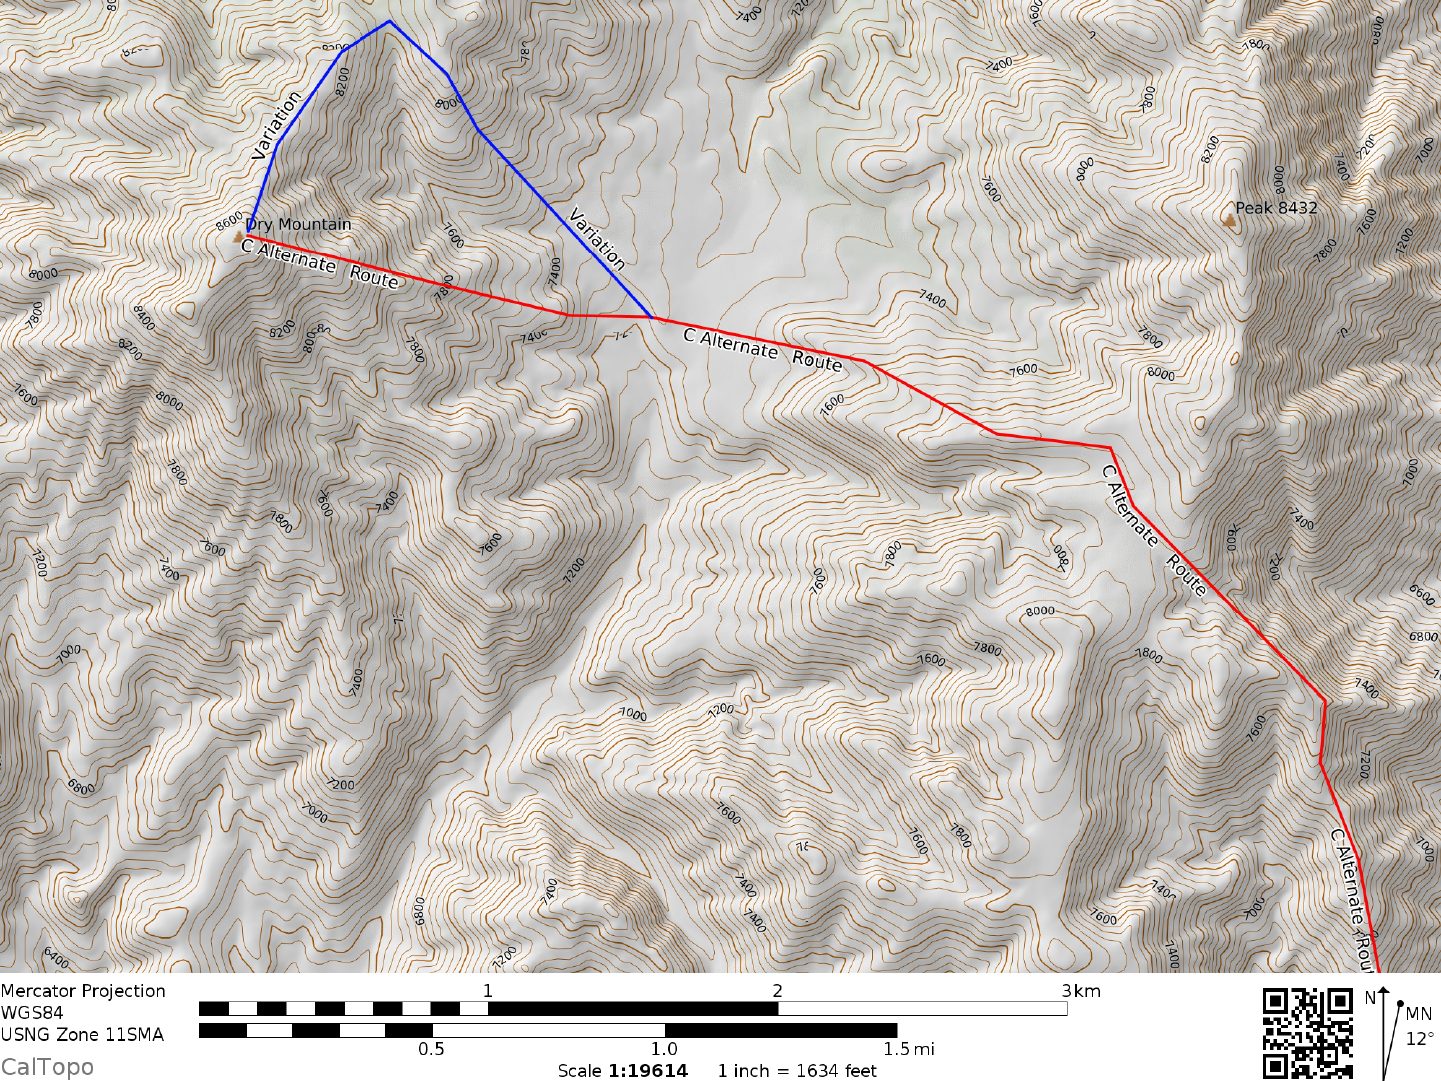
CLIMB/ROUTE C: Start hiking west on the easy terrain, following any one of the easy washes from the road. When you are directly north of point 4938, locate the large canyon that is at a bearing of 244. Continue toward that point, meandering over easy terrain to the mouth of the canyon. Once you have entered the canyon, continue around the toe of the ridge, heading north about 500 ft. (distance) to the easy slope that is now marked with a large duck (UTM I IS, 450724, 4081485) at elevation 6300'. Gain the ridge and follow it over points 7944 and 7934. Between those points, take a look to the east and gaze down at the headwall that you have just avoided. From point 7934, descend down the ridge to the large N-S wash at the 7300 ft level. From the wash, proceed W up a ridge which is followed to the top.
SIDELINES
- This peak is located within the boundary of Death Valley National Park.
- If you'd like to indulge yourself in "touristy" activities during a trip to this part of Death Valley, take a short sidetrip to Ubehebe and Little Hebe craters at the N end of the Racetrack Road. Although it is known that these craters were formed by volcanic explosions, geologists can't seem to agree on just when the eruptions occurred. Estimates range from a few hundred years ago to 10,000 years or more. The large crater, Ubehebe, is impressive in its size. It measures 0.5 miles across (rim to rim), is 450 feet wide at the bottom and averages about 800 feet deep from rim to bottom. If Dry Mountain wasn't enough exercise for the day, consider the trail that leads to the bottom of the crater to round out your cardiovascular conditioning. Along with Ubehebe Crater, consider a visit to Scotty's Castle. Guided tours of the Moorish-style mansion are available daily from 9AM to 5PM for a modest price of admission. Self-guided tours can also be taken but do not include the interior of the castle.
- Doing Dry Mountain from the Saline Valley side, you'll have the opportunity to soak your tired body in the mineral waters of Warm Springs. Lower Warm Springs offers primitive camping and a series of concretelined "soaking" tubs which collect the flow of water from the hot spring. Clothing is optional at the hot tubs. There are also primitive sanitary facilities and a shower area for use by visitors. According to the Park Service the status of the Saline Valley hot springs is still undecided, so things could change here at any time.